Batch Watermark Photos on Mac (Free Text Watermarks)
Post a photo once and it can be anywhere by tomorrow — reposted, cropped, with your name nowhere in sight. For photographers, shop owners and creators, a visible watermark is still the simplest way to keep your work attached to you. It won’t stop a determined thief, but it does stop the casual “save image, repost” that accounts for most of it.
OtterPix adds text watermarks right on your Mac: type your name or handle, pick a font and a color, then dial in opacity, angle and tiling density while a live preview follows every change. The tool is free, it treats a single photo and a whole batch the same way, and nothing is ever uploaded — your images stay on your machine from drop to save.
One mark in the corner, or a grid across the frame?
The classic watermark is a small line of text tucked into a corner. It’s discreet — and it’s gone the moment someone crops the edge off. If the goal is protection rather than decoration, a diagonal pattern repeated across the whole image is far more resilient: crop one mark away and the rest are still there.
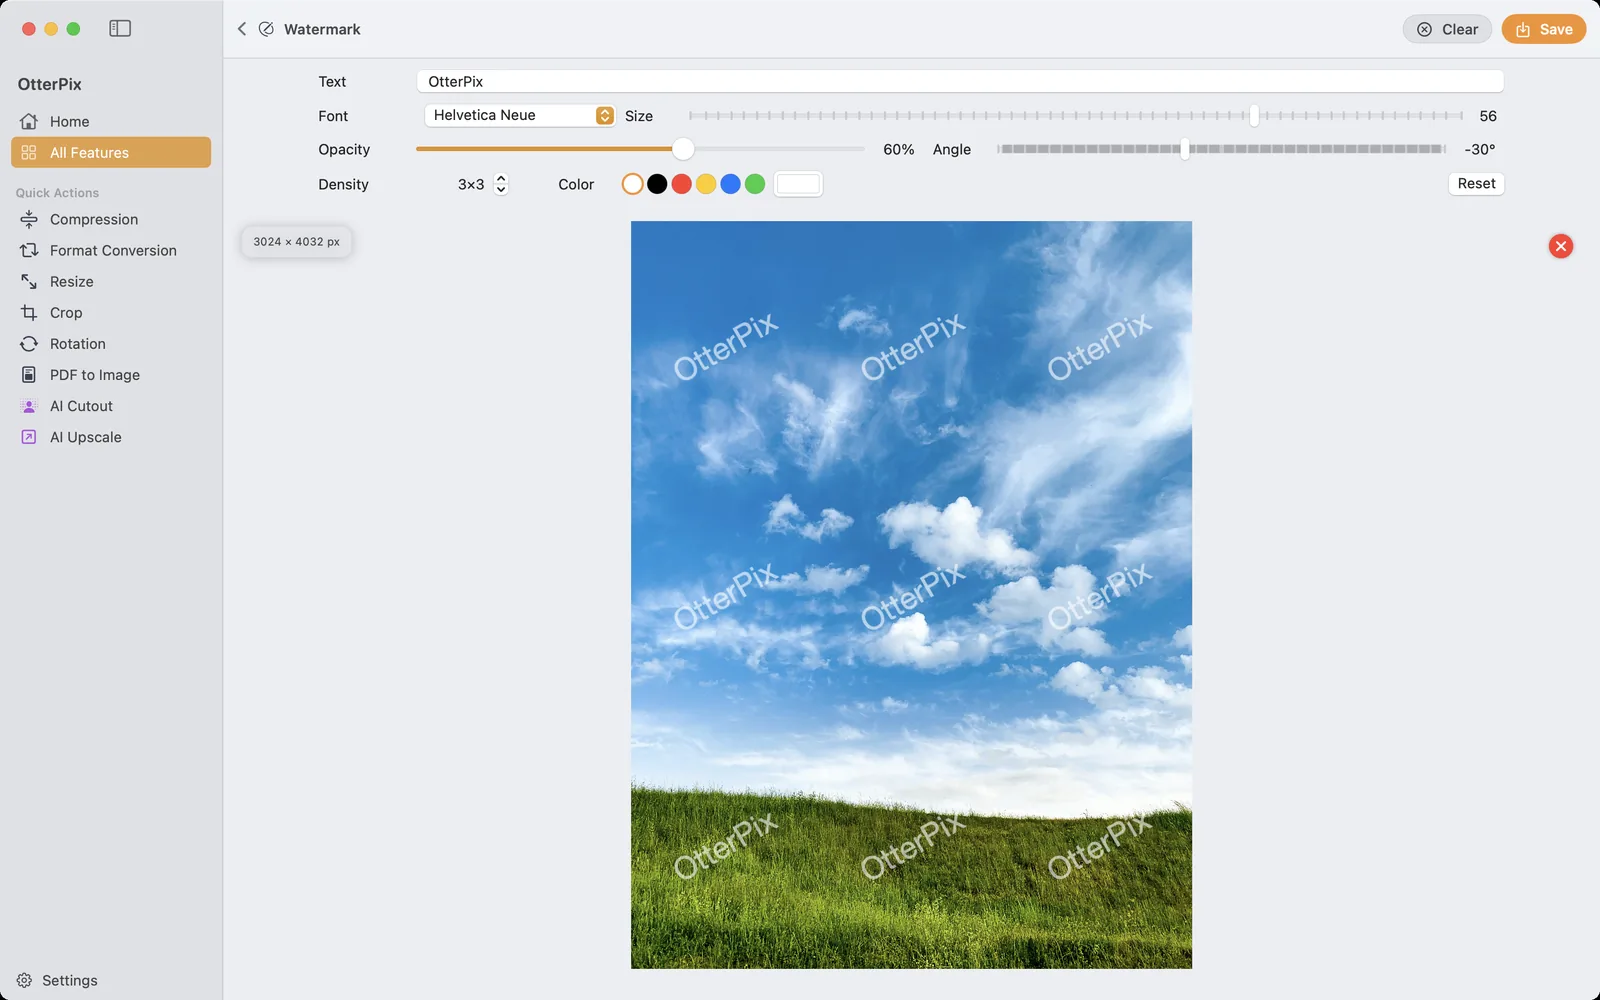
In OtterPix, the Density stepper switches between the two styles: 1×1 stamps a single mark, and higher values repeat your text in an evenly spaced grid. The screenshot above shows 3×3 at a −30° tilt — enough coverage to protect both the sky and the grass without smothering the photo.
How to add a text watermark to photos on your Mac
Everything happens on one screen with a live preview, so feel free to experiment.
- Open OtterPix and click Watermark in the tools on the home screen.
- Drag one photo — or a whole batch — onto the drop zone.
- Type your name, brand or handle into the Text field.
- Pick a typeface from the Font menu. The Common section keeps reliable, legible choices one click away; All Fonts lists every font installed on your Mac.
- Set the Color with the inline swatches — white or black suits almost any photo — or open the full color picker next to them for an exact brand tone. Then adjust Size, Opacity, Angle and Density; the preview updates as you drag.
- Press Save (⌘S) and choose where the watermarked copies go. With a batch loaded, Process All exports every photo with the same settings.
Opacity and angle: strong enough to protect, quiet enough to ignore
A watermark walks a line: too faint and it’s trivial to retouch away, too bold and it ruins the photo it’s protecting. The settings in the screenshot above make a good starting point — white text at roughly 50–60% opacity, tilted to about −30°. The diagonal does more work than it looks: it drags the text across areas of different brightness and detail, which makes it harder to erase cleanly and keeps it readable over light and dark parts alike. From there, let the live preview decide — busy images can carry a bolder mark than clean, minimal ones.
Watermark a whole folder — and resize and convert in the same run
Dropping a batch into the Watermark tool is fine for a one-off. If watermarking is part of a routine — every product shoot, every client gallery — build it into a Pipeline instead. Add a Watermark step, set your text once, and chain the steps you were going to run anyway: a Resize step to bring exports down to web size, and the Output node to convert everything to JPEG.
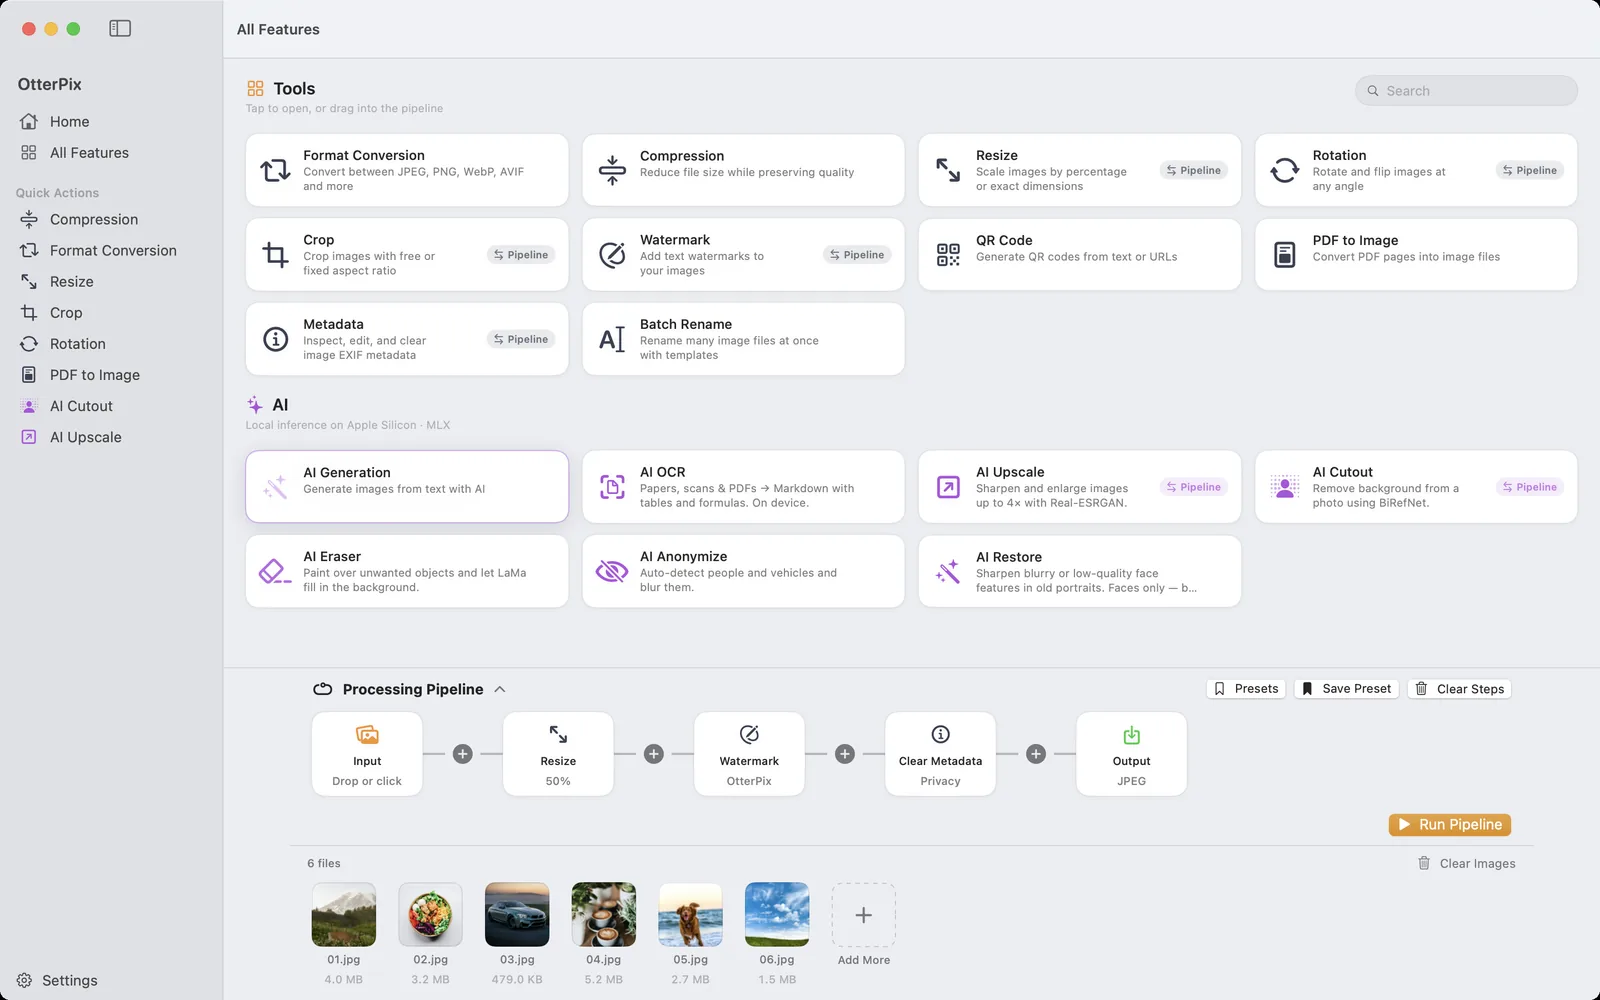
Click Run Pipeline and the entire batch comes out resized, watermarked and converted in a single pass. Save the chain with Save Preset and next week’s batch is a one-click job: drop the folder, run, done. Every step here is a built-in tool, so the whole workflow is free — and since it all runs on-device, it works at full speed with no internet connection at all.
Your originals stay safe throughout: when you save, you choose where the watermarked copies go. Keep one folder of clean masters and one of watermarked exports, and you can always come back and re-export with different settings.
A word about fonts
A watermark is pure typography, so the Font menu matters more here than almost anywhere else. The curated Common list covers legible sans-serif, serif and monospaced faces plus CJK fonts, so a watermark in Chinese renders as proper characters instead of empty boxes. And if your brand lives in a specific typeface, switch to All Fonts — everything installed on your Mac is available.
Frequently asked questions
How do I watermark multiple photos at once on a Mac?
Drop the whole batch into OtterPix’s Watermark tool, set the text once, and click Process All to export every photo with the same settings. For a recurring workflow, add a Watermark step to a Pipeline and run an entire folder — with resizing and format conversion in the same pass if you like.
Is a tiled watermark better than a single mark?
They do different jobs. A single mark is subtle but easy to crop out. A tiled diagonal pattern covers the whole frame, so cropping one mark away still leaves the rest — better for protection. OtterPix’s Density stepper switches between the two in one click.
What opacity and angle should a watermark use?
As a starting point, try around 50–60% opacity with the text tilted diagonally, for example −30°. That keeps the mark legible over both bright and dark areas without overpowering the photo. OtterPix previews every change live, so fine-tune per image — busy photos tolerate a stronger mark than clean ones.
Does watermarking overwrite my original photos?
When you save, you choose where the watermarked copies go. Keep your originals in one folder and export the watermarked versions to another — the untouched masters are always there to re-export from.
Can watermarks use Chinese or other non-Latin text?
Yes. The Font menu’s Common section includes CJK fonts alongside the Latin ones, and All Fonts lists every typeface installed on your Mac — if you have a font for a language, you can watermark in it.
Get OtterPix for Mac
Free on the Mac App Store. Every basic tool is free forever, and nothing you open ever leaves your Mac.

Related guides
Batch Convert, Resize & Rename Images on Mac — One Click
One folder in, finished images out: chain resize, watermark, convert and rename once.
Compress Images on Mac Without Visible Quality Loss
Shrink photos for email, web or cloud — and see the new file size before you save.
How to Convert HEIC to JPG on Mac (Free & Offline)
iPhone photos that won’t open elsewhere? Batch-convert HEIC to JPG on your Mac, offline.